Thought it was about time I posted the upcycled tutorials i have been writing for my column in the fantastic indie craft mag Hazed. So here is the first one (from the Spring 2013 edition).
Skill Level: Intermediate
Fancy making a frock?? Well then this tutorial is for you! First find two pillowslips that complement each other (look for good quality ones – retro/vintage are great!).


Choose one for the dress and one for the straps. I found mine at the local op-shop for 50 cents each.

Measure your pillowslip to get the required length, and add 3cm for hems. If your dress is long, you may need to unpick the folded envelope fabric on the inside of the pillowslip, to get it out of the way when you cut.
Now you can cut your pillowslip to the length required, allowing for a 1.5cm hem at both the top and bottom of the pillowslip. Carefully cut the folded end of the pillowslip open so you are left with a open ended ‘tube’ of fabric. Neaten the top and bottom edges with a zig-zag stitch. Fold each end over 1.5cm, press with an iron then stitch. Press each hem flat.
Now comes the fun part – shirring the bodice. Firstly you will need to hand wind an empty sewing bobbin with shirring elastic (available at sewing shops in haberdashery). Make sure you do not stretch the shirring elastic onto the bobbin, as this will produce uneven tension when sewing.
Place the bobbin in the machine and proceed to sew normally. I like to have the tension on about 4, but this will depend on your machine, so make sure you do some practice runs. When you start sewing the fabric will gather up, so just hold the fabric taught when you are sewing to make it easier.
Start sewing at a side seam and sew right around the fabric. When you get back to the start make sure you back tack a few times before stopping. Before you snip the thread and shirring elastic, pull about 2cms of shirring elastic out from the bobbin to stop it springing back inside the bobbin. Knot the ends of shirring elastic together and snip excess threads.
Repeat this process about 10 times, with each line about 1cm apart. If you have an older girl, do about 12 lines – younger can have about 8 lines to form the bodice.
Tip: - If you are unsure about shirring, practice on an old pillowslip first. Make lines of shirring, about 1cm apart, until you feel comfortable with how it works.
It’s now time for the straps – so take the other pillowslip and measure down from the folded edge about 8cm, and cut across the pillowslip. This will be the 2 front straps. Now repeat this step to make the back 2 straps.
Now fold your strap in half lengthwise so the right sides (with the pattern on them) are together, and neaten with both edges together, going from the top to the bottom. When you reach the bottom, head around the corner and across to the folded edge, so you have one closed end. Now follow the same path with a straight stitch, about ½ cm in from the edge of the fabric.
To turn the straps out, I use a turning tool (available at most sewing shops), but you can just carefully do it by hand if you have the patience!. Once your strap is turned out, you can iron it flat. Now you can neaten the open end together with a zig zag stitch.
Attaching the straps is simple. I like to place the straps about 8cm in from the side seams. You can pop the dress on your girl to find the best strap placement, as it does vary a bit depending on her age.Once you have attached the first front strap, use it as a guide to get the back strap in the same place, so it is even. Then do the same with the other 2 straps.
To attach, place the strap on with the open end just above the first shirring line. Then stitch a square around the edge of the strap.
This is the basic pillowslip dress finished. There are many embellishments you can add to this dress, such as doilies (I like to dye them for effect), buttons where the straps attach, or fabric yo-yo’s. You can even find a complimenting pillowslip with a frill around it. If you carefully unpick the frill, it can be used around the hem of the dress for added ‘girlie’ appeal. Taking your special girl with you to find pillowslips is great too, and if you go op-shopping it teaches her about reusing materials in a fun way.
 After finally taking some of my work into Clockwork Emporium, I realised this label could lend itself to the steampunk genre. Bit more suited than redflax methinks! The tag line 'Freedom fashion' goes with the upcycling theme rather nicely too
So here is the very first creation for Inherit.

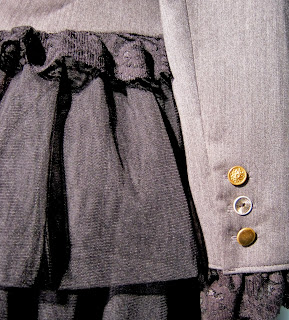
.JPG) One thrifted Portman's jacket and a petticoat. (Got a bit excited and took off the grey buttons before i had taken the initial pic). Anyway, I added some lace and brass buttons, waved the magic upcycling wand and out came Mistress Morganna's steampunk travelling jacket (or something like that). Pretty happy with it. However I have to fight my overactive imagination in this design process.
The difficulty for me is to keep it simple. If I am going to sell my creations they need to not take me many long labourious hours, or its just not worth it. So I have the sage advice from a former tutor floating in the recesses of my mind "You need to edit, edit, edit!" Too many ideas and tangents is my design nemisis. Perhaps 'Inherit' will help me 'tame the beast.' We shall see.
One thrifted Portman's jacket and a petticoat. (Got a bit excited and took off the grey buttons before i had taken the initial pic). Anyway, I added some lace and brass buttons, waved the magic upcycling wand and out came Mistress Morganna's steampunk travelling jacket (or something like that). Pretty happy with it. However I have to fight my overactive imagination in this design process.
The difficulty for me is to keep it simple. If I am going to sell my creations they need to not take me many long labourious hours, or its just not worth it. So I have the sage advice from a former tutor floating in the recesses of my mind "You need to edit, edit, edit!" Too many ideas and tangents is my design nemisis. Perhaps 'Inherit' will help me 'tame the beast.' We shall see.


