Showing posts with label upcycled. Show all posts

Thursday, 18 January 2018

Insprired by Nature

Nga mihi o te tau hau! Happy new year! So I have been on a tiki tour around Northland with my lovely whanau, catching up with aunties and cousins and soaking up our great outdoors. I have been collecting inspiration from Papatuanuku (Mother Earth) for my Oversew Fashion Awards project.
Unfortunately I have managed to put my back out again so I am hoping I can still get an outfit done. Ongoing issues with it which is very frustrating!

So here is some of my inspiration. Green features very strongly so once I am back, I think I will do some opshopping and see what greenery I can come up with 🌿


Have some sketches done too which I will share soon. Isn't Aotearoa Tino ataahua!

Friday, 22 December 2017

2018 Oversew Fashion Awards

I think it is about time I had another go at the Oversew Fashion Awards. So I have decided to track my progress here. With a June 2018 deadline, I am hoping that I can pace myself and not be too rushed :) I have started a Pinterest Board and done some rough sketches, so hopefully inspiration will flow...

Next year is shaping up to be a bit less hectic than this one - I am no longer running a Diploma course for youth workers, which entailed travelling to Wellington a few times a term. I thoroughly enjoyed the experience, but am keen to focus more on upcycling, sustainability and my local community (moved from New Brighton nearly 2 years ago). I am involved with our local Opportunity Shop - Revival Clothing. We have run upcycling workshops in the local school and the commumnity, had 2 recycled fashion shows, hosted a local wedding gown display complete with high tea, had stalls at the local Pumpkin Fest, and supported the school production with upcycled costumes - as well as lots of other stuff. Money raised goes back to the community. We are also running a food/care parcel system for locals in need, and have started up a sewing circle in Birdlings Flat, just down the road.


So all of that is keeping me pretty busy. I have decided to give Youth Work a little bit of a break next year - which will feel a little odd. But I think it is for the best. So it should be an interesting year. Will keep updating my (hopeful) progress on an upcycled outfit for Oversew...

Oh and we inherited a border collie cross from friends. Pip is lovely, and she has settled into life in the country well. She was rehomed off a farm after an accident with a bull. Love having her by my side :)

Thursday, 30 July 2015

Meet Lady Luella Lovelace

Inherit has struck again! This time with a vintage velvet NZ made jacket, a nz designer skirt and some lovely doilies to add a bit of lacyness.


I had initially paired up the velvet with the tartan school kilt, however it didn't quite look right. Then I discovered a gorgeous nz made skirt an the $3 op shop and added with a bit of lace, it looked perfect! The lacing came from another nz made $3 opshop shirt, with laced sleeve detailing. I have to say it was hard to let this one go - especially as it fitted me perfectly!


Thursday, 16 July 2015

In bed with a Hottie - Upcycled Tutorial featured in Hazed Magazine

Skill Level: Beginner/Intermediate (Just a bit more advanced than beginner level)

Just what you need to keep you snuggly on a cold winters night. And to keep you extra toasty why not try your hand at a hot water bottle cover? I have used a thrifted woolen blanket and sheet - however you can come up with your own eco-conscious cover using all sorts of upcycled garments - a woolen jersey, dressing gown or coat. Fabric to applique a design onto your cover can be nearly any type as you will fuse it with iron on fusing, giving it stability and strength. I have used a sheet for this one and neck ties for the hottie cover on the grey cover. Be creative, and feel free to send me pics of your creation, as I love to see what people come up with.

So what you will need to complete this project is:
Your chosen garments/linen/blanket
A hot water bottle for template
A sewing machine
Sewing thread
Sewing pins
Sewing scissors
Taylors Chalk or a light pencil
Ruler or tape measure
An iron and ironing board (or towel to iron on)
Paper or light card for a template and applique design
Sticky tape
Fusable interfacing/violene (make sure it has one side that has glue dots on it)
A button and loop of ribbon or cord for back closure

1. Firstly place your hottie onto paper/card and trace around. Now add 2cm around the entire template except the neck of the hottie. This part needs 3cm on each side to allow for the hottie to fit through the neck hole. This is your front template.

2. Now make a copy of your front template for the back. Measure ⅔ down this template and cut a straight line across. These 2 parts are the back template. You will now need to take the top part of your back template and cellotape 3cm on the bottom edge, so that your top back template ends up overlapping your bottom back template. This will provide the opening to slip the hottie into.


3. Label everything, pin the templates to your blanket and carefully cut around. You will now have 1 front piece and 2 back pieces.


4. Zig-zag stitch around all 3 templates to prevent fraying. You may find the material becomes wavy and slightly stretched. Just press it with your iron and it will return to its original shape.

5. Time to applique. Decide on a shape/symbol etc you like and draw or print this onto paper. Carefully cut around it (good idea to simplify it a bit if there are complicated areas, which is what I did with my NZ map).


9. Repeat steps 7 and 8 to make a small shape to applique onto the bottom back piece to hold the loop on.

10. Now pin the loop at the halfway point on the bottom piece near the top where the opening is.


11. Place your appliqued shape over the loop ends and zig-zag around it, securing the loop ends in place

12. Now place the top back piece over the bottom back piece and line it up until the back pieces are the same size as the front piece. Zig-zag these together along the sides to create the back opening.

13. Now you are ready to join it all together. Place the front piece on top of the back piece with the right sides facing each other.

14. Sew a straight stitch around the pieces 5mm in from the edges right around the pieces, starting at the top neck, and ending up back at the top neck.

15. Press the cover carefully before turning it in the right way. You may need to then press it again once it’s out the right way, to get the curves sitting nicely.

16. Lastly stitch a button near the bottom of the top back piece for the loop to go around to keep the hottie cover closed.

17. Now jump under the covers and snuggle your lovely eco-friendly hottie!


I made the grey one from an upcycled army blanket, to commemorate 100yrs since Gallipoli, and to pay tribute to those in NZ who lost their lives in the war.

Thursday, 4 June 2015

Oversew Fashion Awards Show 2015

The long and the short of it is that i had my entry accepted - only 50 were accepted out of 120 submitted...so even though my design didn't quite meet the brief (in that it looked more like leather and tartan as opposed to leather and lace!) it made it down the runway. I was lucky enough thanks to the lovely Denise from NZ Eco fashion week to be given a ride to Carterton to watch the event. So much fun!!!! Met some awesome people too. One day i would love to put a mini collection into the NZ Eco Fashion Week. Also had a chance to mull over my dream to run a community wardrobe - like a creative space for people to learn and sell stuff and rent clothes for good occasions etc...

So anyway here is my favourite photo from the show - my model linda, a local accounts manager is very funky and rocked my outfit - she was the perfect choice!


A great experience! Next years theme is Fire and Ice...

Sunday, 17 May 2015

Inherit is underway

So my latest jacket is based on a fiesty female Pirate Captain who loves a bit of swashbuckling shennanagins! Introducing Captain Betsy Bonnie:


I had lots of fun creating this one - the skirt offered lots of fabric so i went for full sleeves and a pleat round the hem. Still lots left for another upcycle


I used the cotton tape around the hem to create the stripes on the lapel to give it a hint of militaryness. Now all she needs is a tricorn hat, plume and sword and she is ready to sail the seven seas.


This jacket is available to purchase at Clockwork Emporium, New Regent St, Christchurch. http://www.clockworkcafe.co.nz/

Wednesday, 6 May 2015

Cushy Little Number - Upcycled Tutorial featured in Hazed Magazine

Skill level: Beginner


The warmer months are upon us, and what better time than to freshen up your décor? Instead of opting for mass produced goods, why not try something a little different – and kinder to the planet? Start by clearing out your wardrobe, or take a trip to your local op-shop, and find some inspiration in the many interesting garments that are waiting to be transformed.

For this DIY cushion I have used a retro 60’s dress and a large shirt. As long as one garment has buttons (to make your cushion cover removable), and the fabric is suitable for cushions (ie not fine silk), you are only limited by your imagination. I usually take the cushion inner with me when I shop, to make sure the shirt and the other garment have enough fabric to cover the cushion.

So what you will need to complete this project is:

Your chosen garments (one being a large shirt with buttons)*
A sewing machine (or needle and thread if you are very patient!)
Sewing pins
Sewing scissors
Taylors Chalk or a light pencil
An iron and ironing board (or towel to iron on)
A tape measure Paper or light card for a template
*The best material is generally cotton or poly/cotton and medium to heavy weight. Hold the garment up to the light - if you can see your hand through the fabric it won’t be durable enough for cushions. Remember to make sure your shirt is a large size or bigger, as the smaller sizes don’t have enough fabric for a cushion.

Instructions:
1 Measure your cushion inner from seam to seam. Add 1cm onto each seam for seam allowance.


2 Draw a template of your cushion, remembering to add 1 cm all the way around the template for seam allowances.

3 Now place your template onto your shirt and trace around it. Make sure you have the garment straight and the template on straight. When placing the template onto the shirt, make sure the button and button stand are straight and running down the middle of the template. It can help to mark the half-way point on your template, and line it up with the buttons. Also make sure you do not have your template edges going over the top of a button. The cushion seams need to be in between the buttons. This will be your back piece.

4 Take your cut out back piece, and place it down with right sides together, on top of your other garment. Pin it to the other garment, making sure the fabric is straight. Now cut around the back piece.


5 Keeping the pins in place, sew the back piece and the front piece together, remembering your seam allowance is 1 cm. When you get to the corners, try to sew a curve, so you do not have very pointy corners sticking out when the cushion is stuffed. You can now either overlock or zig-zag the raw edges of the cushion to stop the fabric fraying.


6 Now carefully undo the buttons on your back piece and turn the fabric in the right way. Press all your seams with the iron.

7 Carefully insert your cushion inner into your cushion cover. Spend some time moving the inner around so it has filled the corners and isn’t lumpy.


8 After admiring your creation, find a sunny spot with a comfy chair, insert your gorgeous upcycled pillow and yourself with something chilled to drink...sit back and soak up summer

Monday, 4 May 2015

Inherit - Freedom Fashion

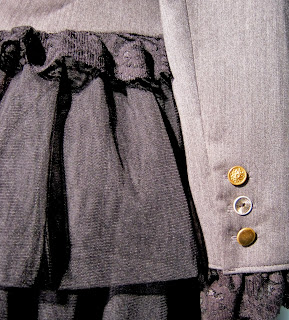
What started as a project at Fashion School 3 or so years ago, has quietly reimerged as a creative outlet. Inherit was the label i created for a branding and marketing project. After finally taking some of my work into Clockwork Emporium, I realised this label could lend itself to the steampunk genre. Bit more suited than redflax methinks! The tag line 'Freedom fashion' goes with the upcycling theme rather nicely too So here is the very first creation for Inherit. One thrifted Portman's jacket and a petticoat. (Got a bit excited and took off the grey buttons before i had taken the initial pic). Anyway, I added some lace and brass buttons, waved the magic upcycling wand and out came Mistress Morganna's steampunk travelling jacket (or something like that). Pretty happy with it. However I have to fight my overactive imagination in this design process. The difficulty for me is to keep it simple. If I am going to sell my creations they need to not take me many long labourious hours, or its just not worth it. So I have the sage advice from a former tutor floating in the recesses of my mind "You need to edit, edit, edit!" Too many ideas and tangents is my design nemisis. Perhaps 'Inherit' will help me 'tame the beast.' We shall see.

Thursday, 30 April 2015

BTW...

My outfit for oversew got accepted! Yay!!! So it will be in the show on 23rd May. Here is a wee preview: Happy with my work - I think next time i will try and work within the design brief, instead of designing something for me and making it fit into the brief. Feel confident enough to do this next year!

Tuesday, 28 April 2015

Pillowslip Frock Upcycled Tutorial - as featured in Hazed Magazine

Thought it was about time I posted the upcycled tutorials i have been writing for my column in the fantastic indie craft mag Hazed. So here is the first one (from the Spring 2013 edition).

Skill Level: Intermediate

Fancy making a frock?? Well then this tutorial is for you! First find two pillowslips that complement each other (look for good quality ones – retro/vintage are great!).


Choose one for the dress and one for the straps. I found mine at the local op-shop for 50 cents each.


Measure your pillowslip to get the required length, and add 3cm for hems. If your dress is long, you may need to unpick the folded envelope fabric on the inside of the pillowslip, to get it out of the way when you cut.


Now you can cut your pillowslip to the length required, allowing for a 1.5cm hem at both the top and bottom of the pillowslip. Carefully cut the folded end of the pillowslip open so you are left with a open ended ‘tube’ of fabric. Neaten the top and bottom edges with a zig-zag stitch. Fold each end over 1.5cm, press with an iron then stitch. Press each hem flat.


Now comes the fun part – shirring the bodice. Firstly you will need to hand wind an empty sewing bobbin with shirring elastic (available at sewing shops in haberdashery). Make sure you do not stretch the shirring elastic onto the bobbin, as this will produce uneven tension when sewing.


Place the bobbin in the machine and proceed to sew normally. I like to have the tension on about 4, but this will depend on your machine, so make sure you do some practice runs. When you start sewing the fabric will gather up, so just hold the fabric taught when you are sewing to make it easier.

Start sewing at a side seam and sew right around the fabric. When you get back to the start make sure you back tack a few times before stopping. Before you snip the thread and shirring elastic, pull about 2cms of shirring elastic out from the bobbin to stop it springing back inside the bobbin. Knot the ends of shirring elastic together and snip excess threads.


Repeat this process about 10 times, with each line about 1cm apart. If you have an older girl, do about 12 lines – younger can have about 8 lines to form the bodice.

Tip: - If you are unsure about shirring, practice on an old pillowslip first. Make lines of shirring, about 1cm apart, until you feel comfortable with how it works.

It’s now time for the straps – so take the other pillowslip and measure down from the folded edge about 8cm, and cut across the pillowslip. This will be the 2 front straps. Now repeat this step to make the back 2 straps.


Now fold your strap in half lengthwise so the right sides (with the pattern on them) are together, and neaten with both edges together, going from the top to the bottom. When you reach the bottom, head around the corner and across to the folded edge, so you have one closed end. Now follow the same path with a straight stitch, about ½ cm in from the edge of the fabric.

To turn the straps out, I use a turning tool (available at most sewing shops), but you can just carefully do it by hand if you have the patience!. Once your strap is turned out, you can iron it flat. Now you can neaten the open end together with a zig zag stitch.


Attaching the straps is simple. I like to place the straps about 8cm in from the side seams. You can pop the dress on your girl to find the best strap placement, as it does vary a bit depending on her age.Once you have attached the first front strap, use it as a guide to get the back strap in the same place, so it is even. Then do the same with the other 2 straps.

To attach, place the strap on with the open end just above the first shirring line. Then stitch a square around the edge of the strap.


This is the basic pillowslip dress finished. There are many embellishments you can add to this dress, such as doilies (I like to dye them for effect), buttons where the straps attach, or fabric yo-yo’s. You can even find a complimenting pillowslip with a frill around it. If you carefully unpick the frill, it can be used around the hem of the dress for added ‘girlie’ appeal. Taking your special girl with you to find pillowslips is great too, and if you go op-shopping it teaches her about reusing materials in a fun way.