Showing posts with label retro. Show all posts

Thursday, 4 June 2015

Oversew Fashion Awards Show 2015

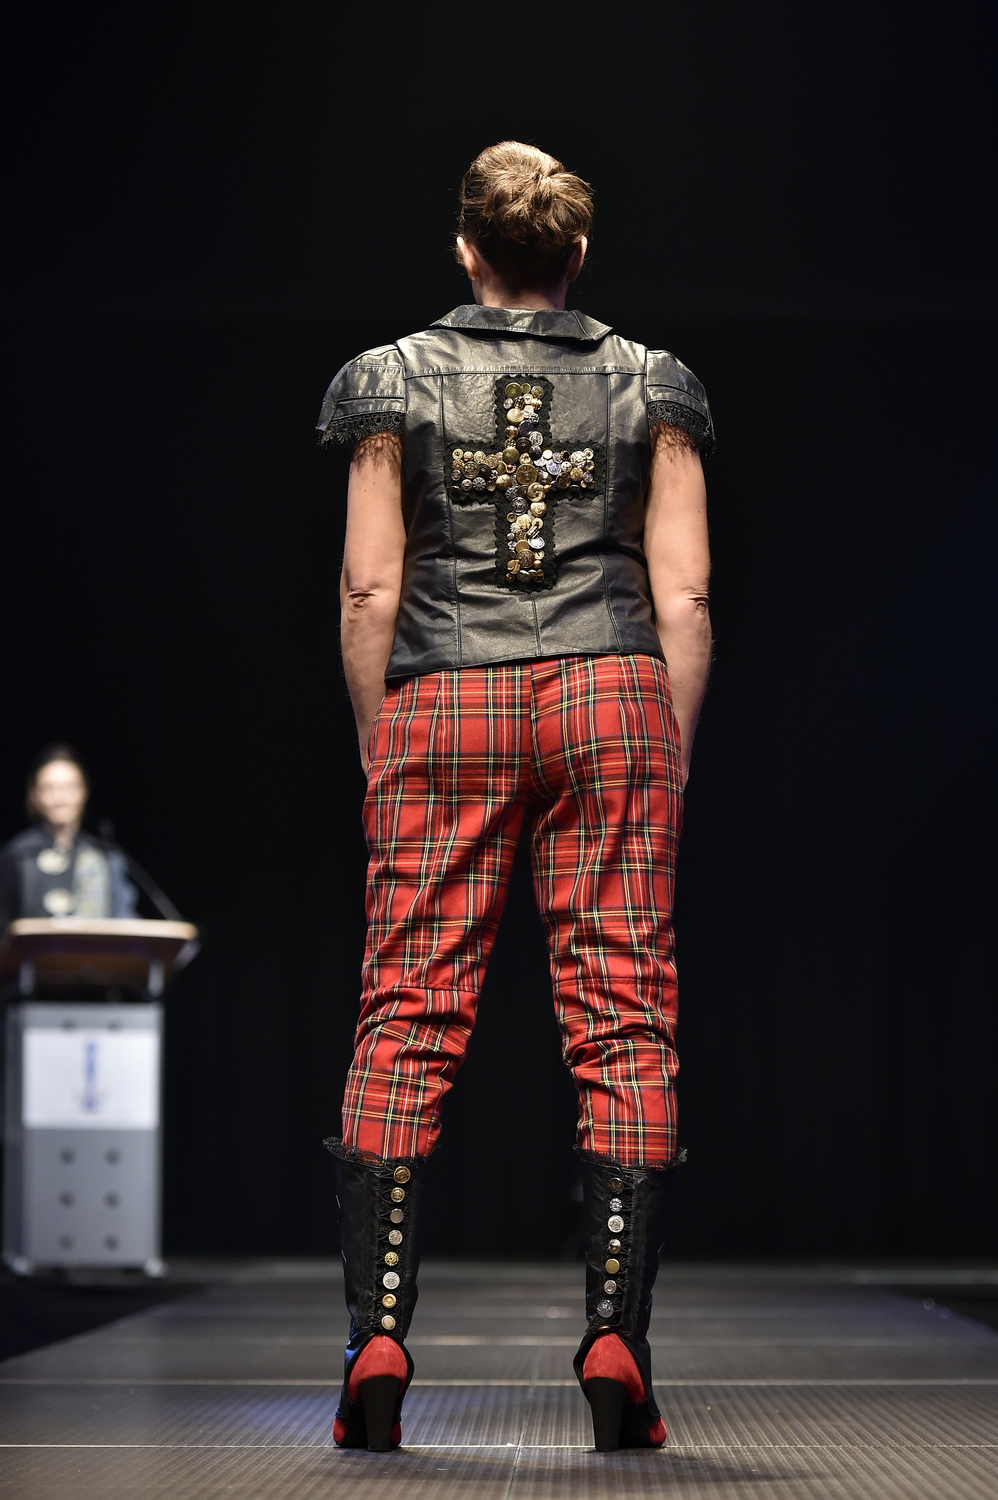
The long and the short of it is that i had my entry accepted - only 50 were accepted out of 120 submitted...so even though my design didn't quite meet the brief (in that it looked more like leather and tartan as opposed to leather and lace!) it made it down the runway. I was lucky enough thanks to the lovely Denise from NZ Eco fashion week to be given a ride to Carterton to watch the event. So much fun!!!! Met some awesome people too. One day i would love to put a mini collection into the NZ Eco Fashion Week. Also had a chance to mull over my dream to run a community wardrobe - like a creative space for people to learn and sell stuff and rent clothes for good occasions etc...

So anyway here is my favourite photo from the show - my model linda, a local accounts manager is very funky and rocked my outfit - she was the perfect choice!


A great experience! Next years theme is Fire and Ice...

Monday, 1 June 2015

With This Ring - Upcycled Tutorial Featured in Hazed Magazine


This sweet little ring bearer’s cushion can be made as a keepsake, by using treasured items from the bride and groom. Perhaps a favourite tie the groom was given by his grandfather, or a vintage button from the bride’s button stash handed down from her granny. Or even clothes from the couple’s wardrobe that are no longer worn. All can be repurposed and easily made into a cushion for wedding rings. You can also look for inspiration in local op shops – for colours or patterns that compliment the wedding. If the wedding party is getting outfits made you could ask for any leftover fabric/embellishments and construct a cushion that will coordinate perfectly. You are only limited by the theme of the wedding and your imagination.


If you are a beginner to the world of sewing, then stick to a simple square or circle cushion, with a button stitched on in the centre, and ribbon to attach the rings. You can use the instructions below, without adding the bunting.


Bunting Cushion
Skill level: heading towards intermediate level
Materials:
Sewing machine and matching threads
Sewing scissors
Fabric
Felt scraps
Ric-rac or narrow bias binding
Sewing needle
Sewing pins
Tailors chalk or a light pencil
Iron and ironing board
Circle template (eg a dinner plate or bowl)
Piece of card (eg cereal box or shoe box weight)

What to do:

Place your template on your fabric and draw 2 circles. Cut them out.


Now draw a triangle template on your card the size you want the bunting flags.

Place the template on the felt scraps, draw around and cut out, until you have enough flags.


Arrange the flags on the top circle into a curve. Make sure the bunting starts and finishes at least 1.5cm away from the edge of the circle, so you do not catch it when you sew the circles together.


Carefully pin the flags down and slowly sew along the top edge, stopping after each one to make sure the next one is in place.


Now sew your bias binding or ric rac over the top of the stitching line (don’t use ribbon as it doesn’t curve well).


Before attaching the top and bottom circles together, you can pin the buntings up and away from the stitching line if you are worried about catching them when you sew the seam.


Place the top and bottom circles together with the right sides facing each other. Sew with a straight stitch around the circle, 1cm from the edge. Remember to leave a 5 – 7cm opening to allow for stuffing.


Carefully clip around the circle every 1cm or so, to ensure you get a nicely curved circle.

Now stitch around the circle again, just inside the first straight stitch you did. This is to reinforce the seam so it doesn’t pull away at the clipped points. You can now trim the seam allowance from 1cm down to 5mm. If you want you can neaten the circle edges together with a zig zag stitch.

Image

Time to turn the cushion by pulling it through the stuffing hole. Once it’s out the right way give it a gentle press with the iron. If the circle is slightly straight in places you can turn it inside out and re-clip it, till the seam has an even curve.


Now stuff the cushion. I used wool filling from an old cot mattress (I washed it first), but you can also use Dacron (the filling used in pillows). Once you have the fullness you want, close up the opening. Fold the seam allowance under, and use a small hand stitch with needle and thread. Now work the stuffing around to fill out the cushion evenly.


Lastly you can stitch on a ribbon, twine or embroidery thread to attach the rings. Make sure this is securely fastened to the cushion with needle and thread, as you do not want the rings to come off.


Now the page boy is all set with a beautifully upcycled cushion, that compliments the wedding and can become a treasured keepsake of a special day. Here are some more examples that have been made from a mix of vintage linen and fabrics, doilies, upcycled clothing, and new fabric

Tuesday, 28 April 2015

Pillowslip Frock Upcycled Tutorial - as featured in Hazed Magazine

Thought it was about time I posted the upcycled tutorials i have been writing for my column in the fantastic indie craft mag Hazed. So here is the first one (from the Spring 2013 edition).

Skill Level: Intermediate

Fancy making a frock?? Well then this tutorial is for you! First find two pillowslips that complement each other (look for good quality ones – retro/vintage are great!).


Choose one for the dress and one for the straps. I found mine at the local op-shop for 50 cents each.


Measure your pillowslip to get the required length, and add 3cm for hems. If your dress is long, you may need to unpick the folded envelope fabric on the inside of the pillowslip, to get it out of the way when you cut.


Now you can cut your pillowslip to the length required, allowing for a 1.5cm hem at both the top and bottom of the pillowslip. Carefully cut the folded end of the pillowslip open so you are left with a open ended ‘tube’ of fabric. Neaten the top and bottom edges with a zig-zag stitch. Fold each end over 1.5cm, press with an iron then stitch. Press each hem flat.


Now comes the fun part – shirring the bodice. Firstly you will need to hand wind an empty sewing bobbin with shirring elastic (available at sewing shops in haberdashery). Make sure you do not stretch the shirring elastic onto the bobbin, as this will produce uneven tension when sewing.


Place the bobbin in the machine and proceed to sew normally. I like to have the tension on about 4, but this will depend on your machine, so make sure you do some practice runs. When you start sewing the fabric will gather up, so just hold the fabric taught when you are sewing to make it easier.

Start sewing at a side seam and sew right around the fabric. When you get back to the start make sure you back tack a few times before stopping. Before you snip the thread and shirring elastic, pull about 2cms of shirring elastic out from the bobbin to stop it springing back inside the bobbin. Knot the ends of shirring elastic together and snip excess threads.


Repeat this process about 10 times, with each line about 1cm apart. If you have an older girl, do about 12 lines – younger can have about 8 lines to form the bodice.

Tip: - If you are unsure about shirring, practice on an old pillowslip first. Make lines of shirring, about 1cm apart, until you feel comfortable with how it works.

It’s now time for the straps – so take the other pillowslip and measure down from the folded edge about 8cm, and cut across the pillowslip. This will be the 2 front straps. Now repeat this step to make the back 2 straps.


Now fold your strap in half lengthwise so the right sides (with the pattern on them) are together, and neaten with both edges together, going from the top to the bottom. When you reach the bottom, head around the corner and across to the folded edge, so you have one closed end. Now follow the same path with a straight stitch, about ½ cm in from the edge of the fabric.

To turn the straps out, I use a turning tool (available at most sewing shops), but you can just carefully do it by hand if you have the patience!. Once your strap is turned out, you can iron it flat. Now you can neaten the open end together with a zig zag stitch.


Attaching the straps is simple. I like to place the straps about 8cm in from the side seams. You can pop the dress on your girl to find the best strap placement, as it does vary a bit depending on her age.Once you have attached the first front strap, use it as a guide to get the back strap in the same place, so it is even. Then do the same with the other 2 straps.

To attach, place the strap on with the open end just above the first shirring line. Then stitch a square around the edge of the strap.


This is the basic pillowslip dress finished. There are many embellishments you can add to this dress, such as doilies (I like to dye them for effect), buttons where the straps attach, or fabric yo-yo’s. You can even find a complimenting pillowslip with a frill around it. If you carefully unpick the frill, it can be used around the hem of the dress for added ‘girlie’ appeal. Taking your special girl with you to find pillowslips is great too, and if you go op-shopping it teaches her about reusing materials in a fun way.
Monday, 23 March 2015

Oversew update

Its almost finished! Can't quite believe i actually got to this point - only about 5hrs ish of construction to go, then off in the post and fingers crossed... Here is a peak at the jacket thus far
I have added the final details to the trousers (buckle closure above the zip and leather detail on the pocket to tie it into the vest) - as well as taking the leg in, as i figure the grungey look needs to be reasonably slim fitting. Happy with them, however i think the knee pads are slightly too high? Not sure where exactly they are supposed to be, but when i wear them, they are slightly above my knee. Hoping the outfit reflects leather and lace - the tartan is pretty bold, so not sure if i have reflected the theme as well as i could have. Great learning process though! And actually really enjoyed working with leather, so i am keen to have another go at this sometime this year. :)

Sunday, 28 December 2014

Mindful Craft

A light bulb moment recently got me mulling over the concept of mindful crafting. So as I reviewed my list of 14 Craft Projects for 2014, it struck me that perhaps this was not quite the best way to go about it. Because I have discovered the art of mindfulness. Being present. Not past wallowing or future worrying, but present existing. Sounded easy enough, but putting it into practice has been akin to breaking a lifelong habit. However, very slowly it is permeating my world. Enjoy the moment. It sounds so glib. Like one of those shallow quotes floating around the twittisphere, or taking up space on Facebook. So much of my creative time has been about the finish line - out of necessity when I ran my own business and studied fashion design. So how to get back to enjoying creativity for what it is. Way back when I was a child, something attracted me to creating and craft. Was it the steady, soothing sound of mum’s Elna sewing our clothes, or the Agee jar filled with 3 generations of buttons to sort and play with on rainy days? Maybe it was the smell of the local fabric shop, and the tactile pleasures of its velvet, silks and satins? Or the visual symphony of prints, patterns and colours splashed over fabrics? It’s about getting back to the simple pleasures of creating. And reconnecting with living in the present moment of creativity. So maybe quantity is not so important as quality. My creative time has gone from a run to more of an amble. The finish line can wait. I am going to enjoy the scenery along the way. And stop to smell the roses – or in my case sort the buttons in the Agee jar!*
*this column is featured in the latest issue of Hazed Magazine - here is the facebook page to find out where Hazed is stocked... https://www.facebook.com/thehazedcollective?fref=ts The above pics are part of my "Cushy Little Number" tutorial which i had so much fun putting together (with my very talented Stylist and friend Dawn Gatenby)

Sunday, 24 November 2013

excuse me mister....

i have a bit of a thing for ties...I had over 200 up until 2yrs ago, when i had to make some room for fashion school study to happen in my sewing room...But i did manage to make quite a few bags...Here are some of them
my blue toned 'all tied up' bag
upcycled tie headband
some of my tie bags ready to sell

this one was entered in the Trade Aid upcycled competition
And now, after a bit of a break, I have started looking at ties again - not that i will ever get back to the 200 mark!!!! Only 5 at present! This gorgeously cheesy one I collected for a christmas decoration, for the frock stars christmas challenge...
ooohhh, how christmasy!!!!
And I ended up making a hanging ornament of a christmas tree - with a paisley purple and green tie...Just made 7 so yo-yo's and stitched them together in order from smallest to largest and there you have it - a cute wee tree! I added some ribbon and beads from my stash, and stitched a vintage clip on earring to the top for the star...So many possibilities with this project...
my sideways pic of my christmas tree decoration...


Sunday, 11 August 2013

the final frock stars refashion

Day 4 and 5 sorted of blurred into each other, and culminated in a late night of slightly wobbly hand stitching and blurry eyes
back view
bow detail at the bodice
front view
i decided to make a head piece with the belt

It's not entirely how I wanted it - I think I could have done a bit better, but I'm happy with it considering my short time frame due to my rather busy existence of late!
My lovely husband got it overnight couriered for me down to Fairle...and i am looking forward to seeing all the before and after images of shock frocks to frock stars! Yay!

Friday, 9 August 2013

from pillowslip to frock

I made a rash decision recently and put my name forward to contribute to a very funky craft magazine - Hazed - created by the wonderful Hazel...After some past knock backs, i have to say i was a bit nervous about it all.  However there was no need......(Hazel is so lovely, and really encouraging!)

So ensued lots of fun finding a cute retro pillowslip from the local purple door opshop...and then a photoshoot - for one of my favourite redflax creations - my fern frocks...Basically a pillowslip dress for little girls.  I have had so much fun creating lots of these - op-shopping for retro and vintage pillowslips matching up buttons from my eclectic and now rather vast button collection, experimenting with dyeing embriodered pillowslips, adding frills on the hem from frilled pillowslips.....you get the idea...Now feels like a great time to share my frock fun with everyone!
Here are some sneak peaks from my photoshoot (coz i can't show all of it just yet!), with my gorgeous friend Dawn.  She has a fabulous eye for design, and happens to have a beautiful restored villa just up the road (which is great, as my little beachy batch is being earthquake repaired, and in rather a state at present!).
sharing a funny moment with my photographer!
Don't you just LOVE the retro iron!
Went perfectly with my retro pillowslip..
 So that is just a wee look at what I got up to - for the full tutorial, keep a look out for the Spring Edition of Hazed e-zine - EXCITING...
And here are some past redflax fern frocks I have had lots of fun creating:
My little G is in this collage - she was only 3 back then!
Loved the colours in this - and the covered buttons
this was the first one I sold - on felt.co.nz
 my cousins girl got this - she still wears  it 4 yrs later!
the orange fabric was an op
shopped waffle weave dressing gown